Upstream Revenue - New Meter Setup (Manual and Upload)
When a new meter is added to a purchaser statement, the meter will need to be setup in the Physical Setup>Meters table. If the meter is not setup, an error will be received when running the Load Previously Allocated Volumes And Analyses step of the Asset Process Control. The steps below show how to add a meter(s) manually or via the uploader.
📘 Manual Setup Instructions
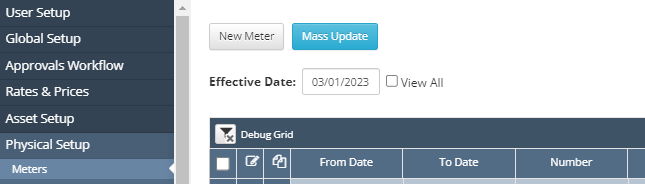
Physical Setup>Meters
Click New Meter at the top left corner of the Meters screen.
A pop up box will appear as shown below:
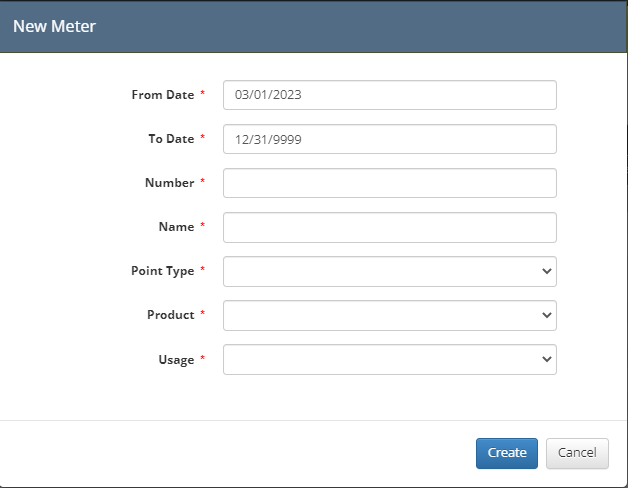
Fill in the data required as follows:
From Date: Needs to be on or before the production date being processed in the Asset Process Control.
To Date: Can be left as 12/31/9999.
Number: This will be the number used in the uploader for Previously Allocated Volumes. This number should match the purchaser data.
The uploader format can be found under Global Setup>Processor Cross Refs. This is the reference selected when uploading the Previously Allocated Volumes in the Asset Process Control.
Name: The recommended name is what the purchaser statement shows; however, this is just informational and can be determined by the user.
Point Type: Select a Point Type from the drop down list.
These Point Types can be used to drive different allocation methods and formulas.
Review setups to select the correct option.
Product: Select the Product Type of the Meter from the dropdown box.
Usage: The Usage box will be populated once the Product is selected.
Click Create at the bottom of the box.
A new meter record will appear on the screen.
The required setups are completed with the New Meter box filled in on step 3, but to add a purchaser reference to the meter, follow step 7.
You can also add the purchaser in additional information.
To add in Additional Information, make sure a Code of Purchaser under Global Setup>Code Tables>Field Items is set up and select the record to be used with the Meter
An example of setup is shown below

In the meter record, navigate to the Additional Information tab
Click New to add a line under the Additional Information tab.
Select purchaser from the dropdown under Field Name.
The Field Value is a free form text field that can be used for the name of the purchaser.
These are the only fields typically set for Upstream clients. Please reach out if you have questions about meter setups you need that are not covered in this document.
📘 Uploader Setup Instructions
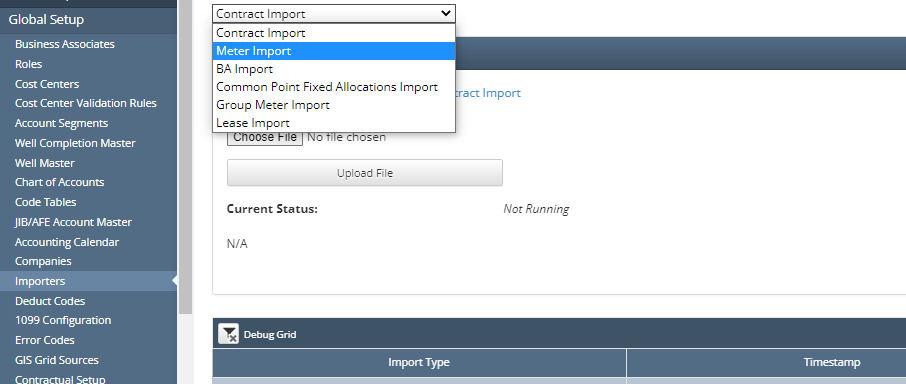
Global Setup>Importers
Navigate to Global Setup>Importers.
From the dropdown list at the top of the screen, select Meter Import.
Once Meter Import is selected, click Download spreadsheet template for Meter Import.
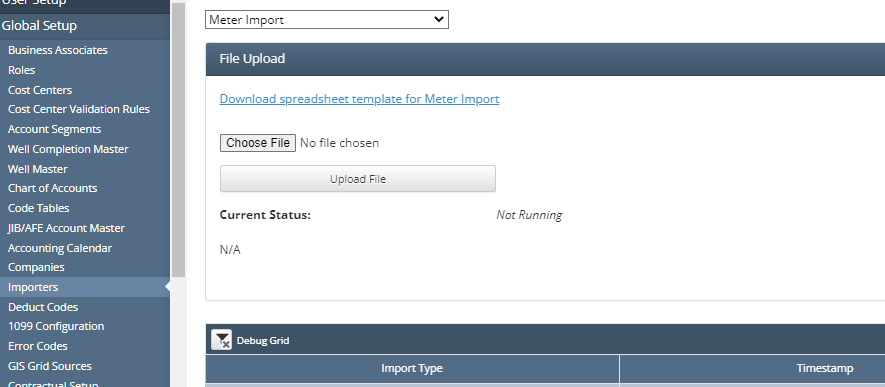
An excel sheet will download.
Meter Import Template
Open the excel file to fill in the template with meters as described below:
Note: for small number of meter setups, see the manual setup steps above.
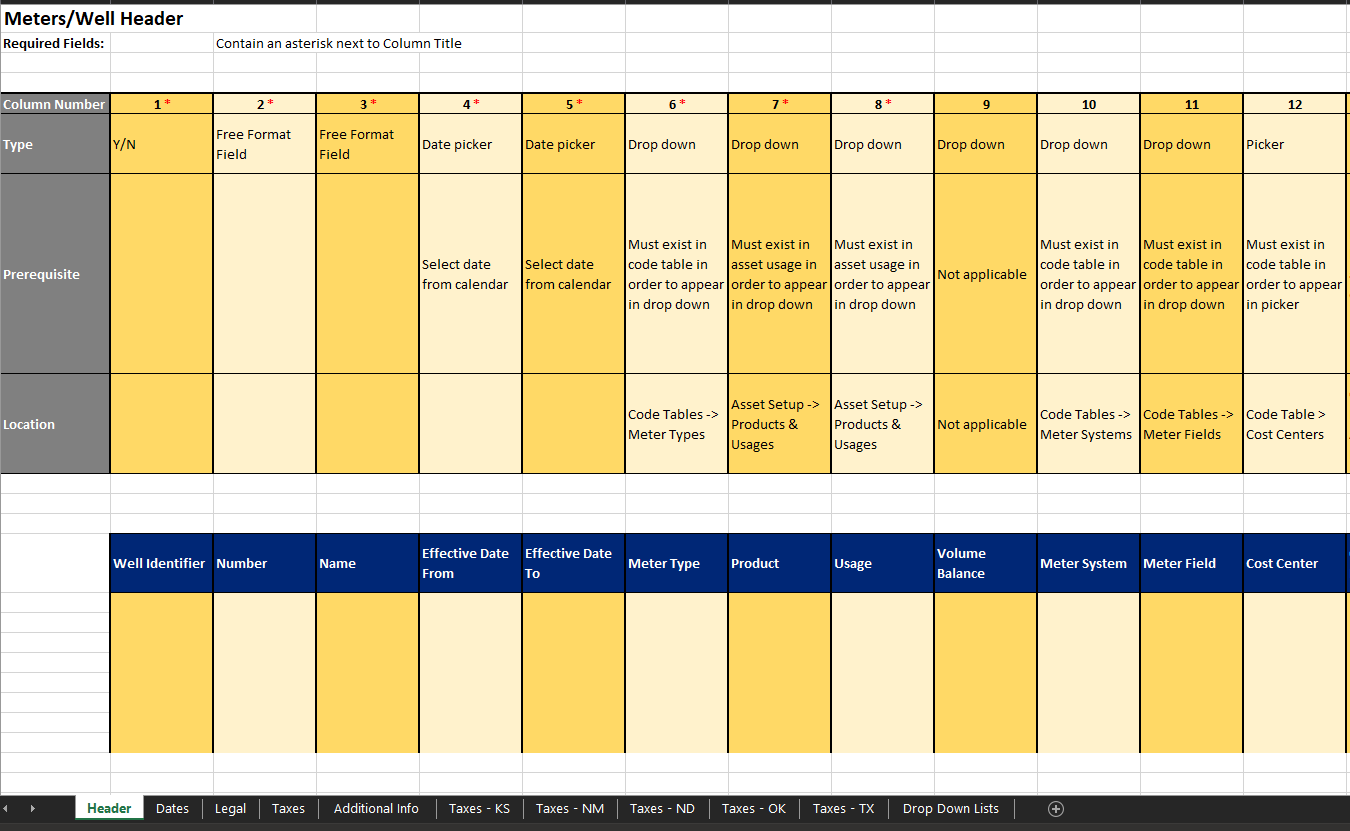
Header Tab
Well Identifier: N.
Number: This will be the number used in the uploader for Previously Allocated Volumes. This number should match the purchaser data.
The uploader format can be found under Global Setup>Processor Cross Refs. This is the reference selected when uploading the Previously Allocated Volumes in the Asset Process Control.
Name: The recommended name is what the purchaser statement shows; however, this is just informational and can be determined by the user.
Effective From Date: Needs to be on or before the production date being processed in the Asset Process Control.
Effective To Date: 12/31/9999.
Product: Global Setup>Code Tables>Product Codes can be used for this field.
Usage: Global Setup>Code Tables>Usages can be used for this field.
Point Type: Global Setup>Code Tables>Point Types can be used for this field.
These Point Types can be used to drive different allocation methods and formulas.
Review setups to select the correct option.
Additional Info Tab: Can be used to add a purchaser reference.
Number: Reference the Meter number the information is related to.
The Additional Info Field Name: Can be found under Global Setup>Code Tables>Field Items (see step c.iv for setup instructions).
The Additional Info Field Value: Free form text field for purchaser name.
To add in Additional Information, make sure a Code of Purchaser under Global Setup>Code Tables>Field Items is set up and select the record to be used with the Meter.
An example of setup is shown below.
Save the file with change and update the name of the file
In WEnergy, navigate to Global Setup>Importers.
From the dropdown list at the top of the screen, select Meter Import.
Click Choose File.
Select the file just saved.
Unless Errors or Fatals are received, the new Meter(s) should appear under Physical Setup>Meters
Once a meter is added, it needs to be connected to a well(s) through the Groups and/or Asset Config screens. See instructions for Adding Well Completions Selections to an Asset, New Group Setup, and New Asset Config setup.